version 1.2
superfluxus media
System requirements
To work with this software you need a
EAX
compatible soundcard
DirectX
7.1
3d accelerated graphic card
Introduction
I have been working
with audio for years (in fact it was a part of my professional life), so I
could follow the development in audio engineering: how the machines were
getting smaller and smaller, how tubes turned into processor units and, in the
end, how the studio itself, as a material place, disappeared. But not really,
since it reappeared again, as a so called virtual studio. I am not
inclined to worry about all that, the only and only thing which is important
though – and in particular for contemporary sound design – is the question,
what kind of change this is. To put it technically: it is the question, if the
virtual studio is just a digital resurrection of the bulky mixer or something,
which brings new elements in the play. One of the dreams I had in mind when I
started working with acoustic material, was being a sound stroller, wandering –
or even better: flying through unknown spaces, experiencing rooms which could
turn into something else. What I wanted was nothing less than space morphing,
but there was hardly a machinery available to fulfil these demands. If you ever worked with a sequencer software
you will understand. Although most of the manipulation processes affect the
spatial quality of the sound, the space itself is completely absent in the
sound processing.
So one of the
fascinations of 3D computer games was the notion, that this technique could be
useful for the fulfilment of that dream, that space could be used as a utility
and therefore could form, in a literal sense, a virtual studio. Compared
to visual processing sound is – at least from a viewpoint of information weight
– a quanité negligable. And when I heard that the producers of audio cards,
Creative™, has introduced a standard that allows realtime processing of 3d
audio, there was the idea that it was time to realize a tool I always wanted t
work with.
Although designed for sound design – in the broadest sense - Mobile
Rooms 1.0 is not another sequencer.
In a way it is just a beginning of a something totally different, that is hard
to label. One could speak of environmental, total surround, but in my thinking
it s much more a philosophical turn (and this tiny little program being a pure
symptom of that). We are on the brink of a paradigm shift which is deeply
rooted in our cultural history: and it’s the moment the time bar turns into a
space bar. I just state that here (I
wrote on that extensively) – and a manual is not a seminary. So, if you are fed
up with sequencers (as I am), this tool might be something for you. And if
you’re player, then even more. And if you are just curious - jump!
Berlin, im November 2002 Martin
Burckhardt
3d audio
In the current state (version 1.2) Mobile Rooms is designed for 3d material. What
does it mean? It means that the current stereo notion is outdated
and that you have to go back to times, where sound had only one channel (which
is in fact far more realistic than depth simulation by the means of two
channels). In regular life you won’t find stereo sounds, just monotonous sound
sources. So please – if you want to use your own sounds (not just the samples
delivered with this package), please change them into mono files. If you don’t,
the system won’t bother, it needs just a little more time to transform your
stereo sources into mono files. Another requirement: use files with 44.1 sample
rate.
Let’s start. First thing we have to do is to hear something. When you
open up the program it will show s screen like this:
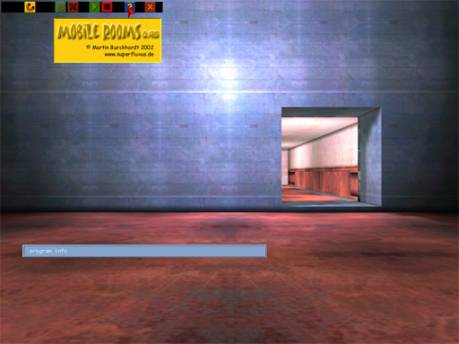
There’s a room, a status bar at the lower part of the screen - and a
main panel at the top. This main panel will be your navigation port, so let’s
have a closer look.
![]()
I am quite
sure that this bar will get bigger and
bigger and that it will be rearranged, so let’s concentrate on the meaning of
the icons.
![]()
terminates
the program
![]()
gives
information about the version number
![]()
opens up the data manager
![]() with this icon you usually start your session. It opens a window
that shows the available wave files and allows you to position them in space..
with this icon you usually start your session. It opens a window
that shows the available wave files and allows you to position them in space..
![]()
the green
icon opens up the environment setting.
![]()
this opens the sound setting.
![]()
this should be self explanatory and
says: start playback.
![]()
stop playback.
![]()
this opens the recorder bar
![]()
a toggle that hides or displays all
the environmental eyecatcher elements
![]()
a toggle that hides or displays the
sound elements
![]()
movement control
![]()
path control
Generally – besides
the play and stop function the main panels does not execute any commands, its
function lies mainly in opening and closing the various areas of manipulation.
So if you click once, the window appears - if you click the icon again, it
disappears.
There’s another
aspect which you will soon realize. The icon colours correspond to the dominant
panel colours - so this may serve as a
colour sign system.
Third thing: in order to click you have to make the mouse visible. This
is done by a rightclick. (You have, I am sure, noticed meanwhile, that this
program does not match to the usual windows grey. Yes, that’s right, it is much
more like a game environment. There are disadvantages, particular for the
programmer: he has to reinvent windows again. And since this is an arduous
task, the interface is – to put it mildly – improvable (scrolling windows and
so forth).
Setting up my first sound
If you want to
import a new sound, you have to chose a sound source. In the current state the
program offers you all the files it finds in the WaveFiles subdirectory. At the moment there
are just 4 sample sounds (because to save download time), but I would strongly
recommend that you copy your own files into that subdirectory (remember to
transform them to 44.1 mono files).
Click the yellow button of the main panel. The following window appears:
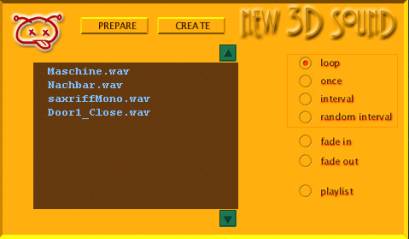
On the display you
see the list of the available sound files. (In case you copy your own files
into the subdirectory, they will appear here too). At the right you see some
radio buttons: the allow you to control some time and event aspects. you can
determine whether you sound shall play looped or just once.
On the to you see
two buttons that seem in a way redundant: prepare and create. Why
should I prepare a sound - why not create (position) it right away? The answer
is simple: before you want to play the sound in the environment you may want to
hear and fine tune its characteristics. This is what could be understood as preparation. To
chose a file, simply click on the filename and then on the prepare button. You
will hear the sound immediately.
Generally the logic
goes:
prepare -> create
What happens if you
create a sound? Visually you will see a yellow sphere - which is a
placeholder to make you see what is
invisible otherwise: sound. This visualization will help you to find you sound
object easily.
When you click on
such a sphere the sound setting window will pop up (which will be explained in
detail later). That means (again a contrast to sequencer logic) that the object
itself stores the object related information.
On the display you see the name of the sound - and all its parameters.
When you change them you may or may not here some difference. That depends upon
the parameter you are affecting. But before we study this we are looking for
the environmental aspect of this.
Environment setting
Actually -
the overall environmental setting may affect a sound dramatically, much more than its individual
characteristics. Sounds - if you put it that way - are communistic by nature.
Because of that we will shift our notion to the area, which is common for every
single sound: the space they reside in. To this purpose click the green (ecologic)
icon - the following window will appear on the screen:
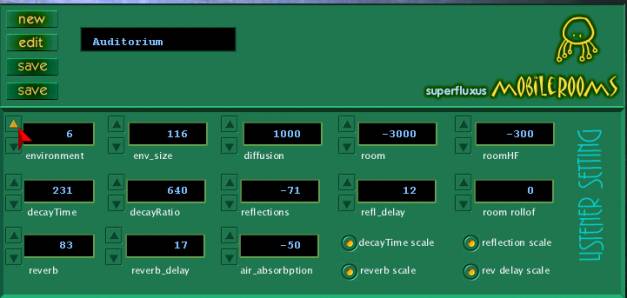
I have to admit:
this might look like one of these effect machines that abhor people to work
with audio material. But even if you declare yourself an acoustic analphabetic,
it is not as bad as you may think. You could live with just one parameter,
which is the first number and is called environment. If you click up and
down you will see on the display that the title changes. The auditorium may get a forest or a bathroom - and you notice immediately (although a saxophone player in a bathroom
may sound somewhat strange): This is a bathroom.
Actually there is a
number of 25 presets stored (which have been delivered with EAX). These may not
be edited, but this is no limitation at all. You have the opportunity to store
your own settings too. Actually there
is an unlimited number of rooms.
So - if you don’t
want to plunge into the subtleties of sound programming just use this button.
For those who want to store their own rooms here, a few words to the single
parameters:
environment if you click this you go
another environment. And you will see: all the parameters will change
env_size this is an abbreviation for
environment size. Normally small values between 1-50 make sense.
diffusion this controls the echo
density in the reverb part of the sound. If it is set to 1000 the most dense,
diffuse state is obtained. Whirlwind. (But be aware: if there is no
reverberation, nothing happens at all)
room stands for the surplus
room effect which is added to the singe sound. It is, to take up the political
metaphor, what the system
does to you - the
extent to which you are informed/deformed.
roomHF what the hell is HF? It
stands for the high, shrill frequencies of the system added sound. And this
parameters attenuates these shrill parts, leaving just the low, dark frequencies unattached. This gives kind of a dark murmuring aspect. 0
means no thing, -1000 means - there are no high frequencies left in the
reflected sound.
decayTime in milliseconds (the durance
of the reverberation)
decay ratio - this get somewhat
complicated. Once again it about frequencies. You know that low frequencies
means low tones. DecayHF ratio controls the durance of the low and high tones.
If it is set to 100 there is no effect at all, if it is below 100 the high
frequencies are faster attenuated than the low ones. This is the natural way of things: Remember sitting at a lake and
hear distant music - it’s slow, murmuring waves. If you set the value above 100
you go into the supernatural: the shill, brilliant frequencies will last longer
than the lower ones.
reflections think of sounds as ping
pong balls. So the number of reflections are the number of balls that may be
reflected by the walls. It’s obvious: if your inside a room there are more
reflection than outside. (min -1000 - max 100)
room_rollof this attenuates distant
sound. This parameter is extremely important, and I think that the Creative
presets do not get the maximum out of this. To use an analogy: room rollof is
for 3d audio, what the main fader is for the sequencer logic. So – play around
with this, to see what kind of effects may be achieved.
reflect_delay the delay time of the
reflection. If you have a big hall there will be considerable delay time (min 0
- max 300)
reverb reverb aspect relative
to the room characteristics. It increases and decreases the loudness of
reverberation.
reverb_delay his delays the starting
time of reverberation (in milliseconds)
air absorbtion with this you can
simulate sound passing through foggy, dray air etc.
You see, it is not a big deal. Just play around, and after a while you
will get accommodated.
Editing sounds
Once you have
created a sound, you see his placeholder sphere. If you click on it, the sound
setting window will pop up - with the name and attributes that are stored for
that specific sound.
Usually you are
inclined to change this and that, so we have to talk about the parameters (for
the easy going guys: there are just a few you have to know).
The first and basic
you have to know is the concept of minimum and maximum distance. If you set a
minimum of 5 meters, it is guaranteed that the absolute loudness of the sound
begins at a distance of 5 meters. If you have, for example, an aeroplane it
would be recommendable that the minimum should be 50 meters. If the object of
the sound is a small insect, the minimum distance should be less than a meter.
But the irony of it: if you measure the sound in absolute numbers the sound of
a bee and an aeroplane make no difference at all. What differs, is just the
distance these sounds may pass
without being
attenuated. If you grasped that, the concept of the max_distance is self explanatory. It is the
moment where the sound is on the brink
to silence.
So - these values
are the most important ones (and they substitute and refine the volume concept
you know from your cassette decks).
The next parameters
which have as dramatic effect on the sounds as this will be found a few lens
below. They are called occlusion and obstruction (and they are accompanied by the
respective filter setting).
Occlusion stands for the phenomenon you may
know as TV next door, a muffled sound. So if you want to create the illusion of
something being separated by a wall, you would play around with that parameter.
Obstruction produces a similar
effect - but is not made for simulating walls but an object which lies between
the listener and the object. So the direct path is muffled, but the reflection
(echo, reverb etc.) remain unchanged.
Also something new
for the newbies in 3d audio are the parameters outer cone/inner cone, inner volume, outer volume. Generally: these parameters allow you to
create the illusion of directed sound. Normally: a sound source is thought as
an emitter that emits its waves circular to all directions. A directed sound
would narrow the diameter of 360° - its cone would be different. Inner cone
stands for the inner opening (and inner volume for the respective volume),
outer cone means volume and cone at the outside of the sphere. I have to say:
you need a little training to get accommodated with these settings, but they
help you improve your sound picture dramatically.
Ok, let’s go on
with the rest:
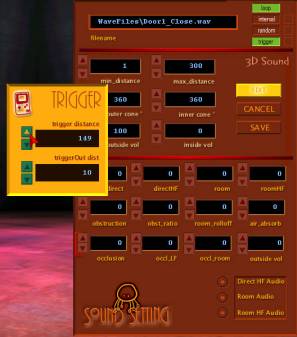
direct allows you to increase/decrease the
sound volume
directHF – HF stands for high frequencies, so
this may be compared with an equalizer
Outside Volume HF – enhances the directional aspect of
the sound
Room and RoomHF – by these values you control not
the sound volume itself, but it’s »social life«, that means: the volume of resonance
and room reverberation
So this how it sounds. But there
remains the question that has been the realm of sequencers. When? I guess you are not astonished to hear that
this concept is treated in a different way. In this program time unfolds when
you move – so time is not something as such, but your own time. Nevertheless Mobile Rooms allows you to
control certain time and event related aspects of the sound (and in the next
version there will be something which looks like a sequencer). You see these
parameters at the top right side of the Sound panel, articulated as a yellow
button. You may determine whether a sound is looped, played one, and if so,
regularly or randomly differentiated, and you may further decider whether the
sound is triggered by distance.
Playing a looped
sound is something we are used to, hearing something once also. The interval
seems accommodated too, although it should be mentioned that the term relates
to the interval between the repeated sounds – the pause, as a musician would
put it. But what is random interval? Very easy: it stems from the notion that
mechanic repetition can be annoying. Therefore a slight - or in certain circumstances: a big
deviation could enhance the perception. Does it come again – or has it stopped?
With the random factor you control the percentage of deviation. If you take a
value of 10 that will mean that the interval can be plus/minus 10 percent long.
The trigger aspect is one of the most interesting aspect for our way of
looking, or better: hearing things. It means: that the distance between the
sound and the listener determines when the sound begins to play. Trigger works
like a photoelectric barrier. But if you set a high distance it could be
used as a way to spare the processors capacity.
 Making sounds fly around
If you have worked
with conventional sequencers, you are used to filter management. Generally:
besides being a time machine, a conventional sequencer is a big filter machine.
And the art of audio engineering is commonly considered as the mastering of
this field. So you might miss such an instrument when you begin to work with
Mobile Rooms. In this regard the difference (and the conceptual novelty) of
this program gets evident. In contrast to a conventional filter machine which
treats the individual sound as a single entity, you have to be aware that sound
in Mobile Rooms is always a symptom of a spatial relationship. So it fades away
when the distance grows, and it fades in when you get nearer. The very same
logic applies to all the characteristics which up to now have been managed by
filtering. Take a common effect like vibration. If you work with Cubase, you
would just trigger the vibration effect machine – and if you want to change the
effect over time (making it increase or decrease), you would make a record of
that effect channel.
Mobile Rooms offers
something totally different. Instead of simulation vibration by means of an
effect machine, it allows you to create actual vibrations – to spin the object
around. Let’s have a closer look at this.
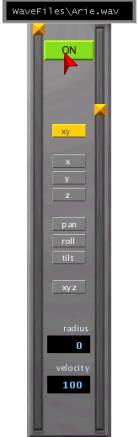
Rightclick on the
sound sphere – and the following panel appears.
This is all you
need to create some strange effects. As you see on the first glance everything
here is about spatial positioning. You have the axes x y z, you have a combined
xy and a a combined xyz axis (to allow you to create circular with ease), and
the you have the angle axes: pan roll and tilt. There are just two basic
parameters for you, the sliders that are entitled radius and velocity. Let us
begin with a simple example.
First we click the
on off button at the top. If it turn green our slider movements will affect the
soundfile, which is displayed at the top of this sound movement panel. Let us
choose combined xy – that means a simple circle (the radius of the x and y axis
are equidistant). If we increase the radius we see that the sound sphere is
going to circulate. By means of the velocity slider we can control how fast our
sphere is spinning around. The may go up to extreme velocities the graphic will
not display anymore (but in term of audio it will be calculated properly).
Bringing the sound sphere into a circular movements affects the sound
dramatically. Corresponding to the environment and sound settings you will hear
a constant fade in fade out, equalizing etc. With one setting you create an
effect which would usually afford numerous effect machines, and a delicate fine
tuning of all the involved parameters.
You do not have to
fade anymore. What you do instead (which is the equivalent of a fade): you set
a radius, you set a room rollof for the sound and the environments
respectively.
But lets us take
another step. Though it is nice to see the sounds fly around – there are a some
other aspects which lie dormant here. What about changing the angles while the
object is moving? Very easy. You create a double circulation: the object
circles around an absolute and a relative centre which is its centre of
gravity. And if pan roll and tilt axes are implied, you may creating some
strange behaviour. But what does this mean in terms of acoustics? Here comes
the concept of directed sound into play – which we have touched in the previous
section. To create a directed – we remember – we have to change the outer and
inner cone angle – and the respective volumes too.
Immediately we hear
that the sound begins to change its characteristics. One could say: the sound
is beginning to breathe, producing the
minor deviations which create the illusion of a living being. This might be an
interesting option for midi music – or synthetically produced sounds (further
versions of Mobile Rooms will support MIDI). So it is the interplay between
static sound and environment characteristics and movement which determines the
field – and mastership of this kind of audio engineering will lie in the subtle
understanding of their interplay. If you want to convince yourself how a single
parameter may effect that relationship, go to the environment setting and play
a little bit with the room rollof factor.
Fly yourself
If sounds can fly –
why not fly yourself? Nothing easier than that, since you can transform a sound
sphere into a leader, or better into a vehicle that you just enter. To do this,
click the path icon on the main bar. Another panel will pop up at the up (which
will we discuss later). For the moment we are just interested in the button
which is entitled object. When we click that, we are asked to right
click on the sound sphere that we have chosen to be our spaceship. It is self evident that it should be a
moving one, otherwise you will just reside at the position the object occupies.
If you choose an object you will notice that another pops up. This is the
monitor which follows your spaceship. Instead of using such a monitor I could
have decided to use the whole screen – but after I did that I found out that
this is really difficult. If you use pan and tilt, the view turns into a roller
coaster ride which produces vertigo and makes oversight an accident. So the
compromise is: using the small view as a monitor for this movement, whilst the screen
itself stays the same.
But we do not have
to forget that these display considerations are secondary by nature, because we
want to change acoustics. In this respect the »spaceship« produces interesting
result. (A little side remark here: it is recommended to use a dummy sound
sphere instead of a audible one, since this sound would always be at the
center. Under certain circumstances this might be a strongly desired effect,
but in other circumstances disturbing. So use the silence.wav if you
want to populate your environment with such a dummy).
If you want to unlock your listener position (leave your spaceship),
simply click on the path icon again - and choose the unlock option. You are on
solid ground again and the monitor view will disappear
The right path
Let us shift our attention to the path panel that we have mentioned
already. Circular movements are great, they exempt you to think of a beginning
and an end - but they can be annoying
after a while, making you simply dizzy. Therefore there is an alternative way
of path management implemented in Mobile Rooms: just record the paths you are
actually doing. You can record, store and load an unlimited number of paths
(when you press the key I you can slowdown the effect – producing a slow motion
effect thereby).
![]()
Let us have a look
at the panel. If you click into the little display field, you type in the name
of the path that you want to store. Now recording a path will create such a
file. Recording a path is as simple as another recording processing. Just click
on the record button – and it will begin to flicker. To stop recording press
the stop button (or the record button again – that does not matter). To
playback the path click on – guess where? I think you got it, and I will spare
you the repetition of things you already know.
If you want to load
a path, click on the path button – the path data panel will popup. The only
thing you have to aware of is the fact that you have to confirm your choice by
clicking into the display window again. Playback will start immediately.
In the current state the path management is a somewhat clumsy affair.
After you have played around with it you will soon sense the necessity of fine
tuning and editing your movement. And this is admitted beforehand: this will
come in the following updates.
Morphing rooms
One of the stunning
effects of Mobile Rooms is its capability to create morphing rooms. Why
should I need that? The disadvantage of just one overall acoustic setting lies in the fact, that the specific sound
characteristic does not fit to your notion. Passing from one room to another
often creates an amazing, overwhelming sensation: you pass a threshold, a door
or you find yourself outside of a building – and everything sounds different.
In fact: this is what I was looking for with the concept of morphing rooms.
You find an extra panel for that.
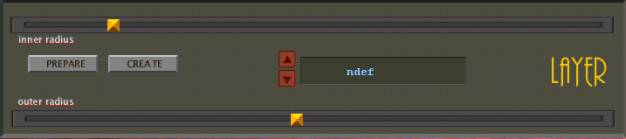
With this you
create subspaces. Click on the CREATE button (PREPARE is meaningless in the
current state) and an illuminated sphere will appear at your position. This is
– like the sphere representing the sound object – a visual placeholder. Using
the two slider (entitled inner radius and outer radius)
changes the appearance not only of the visual object, but also for the acoustic
room. With the outer radius you adapt the extension of that space. With the
inner radius you define, that the this part (the inner circle so to say) is not
transitional spaces but just this acoustic setting. Yes, that has to be done
also. You have to define, what kind of room this shall be. Just click on the
buttons beside the text field and choose the setting that fits.
When you work with morphing rooms, you might confront a problem which is
not resolved in the current state. The effect is: that there may two audio
streams instead of one, thereby producing some unwanted effect. This will
particularly occur with looped material. So I strongly recommend using the
space mrophing effect with either triggered or interval cntrolled sounds.
Data Management
There comes a time
that your material is getting more and more complex, so you want to store it.
In this case data management is related to different aspects of the program, so
this has to be commented:
First the storage
of the recorded wave files (implemented very poorly up to now), second the
storage of room characteristics ( we have talked about that), third all the
data that relates to a session. To save a session in one big rush is the straightforward way – and you can do that
via the data manager. Here is how it looks.
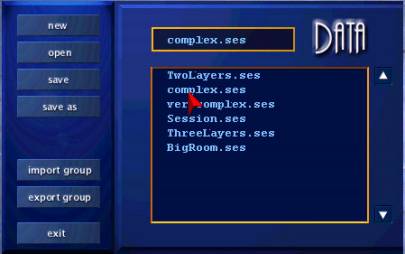
In a way this is self explaining. You choose the data you want to store,
click on the data field, and that’s it. – Playing with the may you may note
that the storage of groups is not implemented yet. It stands here as a
placeholder. Groups will be – like the storage of material characteristics -
the next step of this program. To order sounds in sound families would be
helpful, for data management as for aesthetic reasons as well. It would be nice
if one could not the very same voice over and over again, but something out of
a pool of sounds, randomly chosen.
Recording Sounds
On the main panel you find a record
icon. If you click it, a recorder bar opens up at the bottom of the screen. If
you click the display field you can type in the name of the soundfile you want
to create. All the output wave files are stored in the wave output
subdirectory. In this trial version you may record sounds up to 30 seconds. If you
register this limitation will be cancelled.
A few words of things to come
The actual state is
more than a beginning, so no need to excuse. But there is still plenty of room
left for fantastic new features. Although the current state of Mobile Rooms
offers a lot there are a few desiderata on my agenda (I will do anyway, just to
please myself)
Grouping
material presets
management of sound families
a two dimensional panel which allows
easy positioning (to replace a sequencer)
and the creation of trajectories
refined movement avi support
Next version...
Why get a registered user
You may record
unlimited time. And you keep the project going on… and there more you, faster
and faster.
To register you go
to:
http://www.superfluxus.de/MobileRooms.html
there you find a
link to the registration page. Registration is handled by ShareIt - world wide
and realiable.
If you have
comments, question, we try to answer fast and thoroughly. Mail to